Welcome to the seventh installment of our article series, Track Breakdowns.
In this series, we look at the theory and arrangement behind popular songs, ultimately showing you what makes each song work.
In this breakdown, we’ll be looking at Say My Name by ODESZA.
ODESZA is known for their emotional, arithmetic writing style. They beautifully weave together the electronic and acoustic realms, creating music that speaks to both the brain and the heart.
How are they able to do this?
Let’s dive into Say My Name and see if we can figure out what makes ODESZA’s music so memorable and catchy.
The Sauce
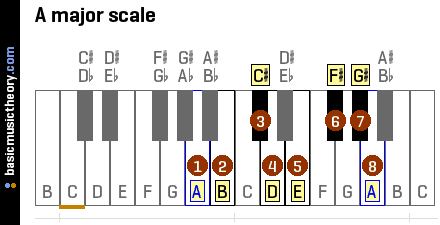
Say My Name is in the key of A Major.
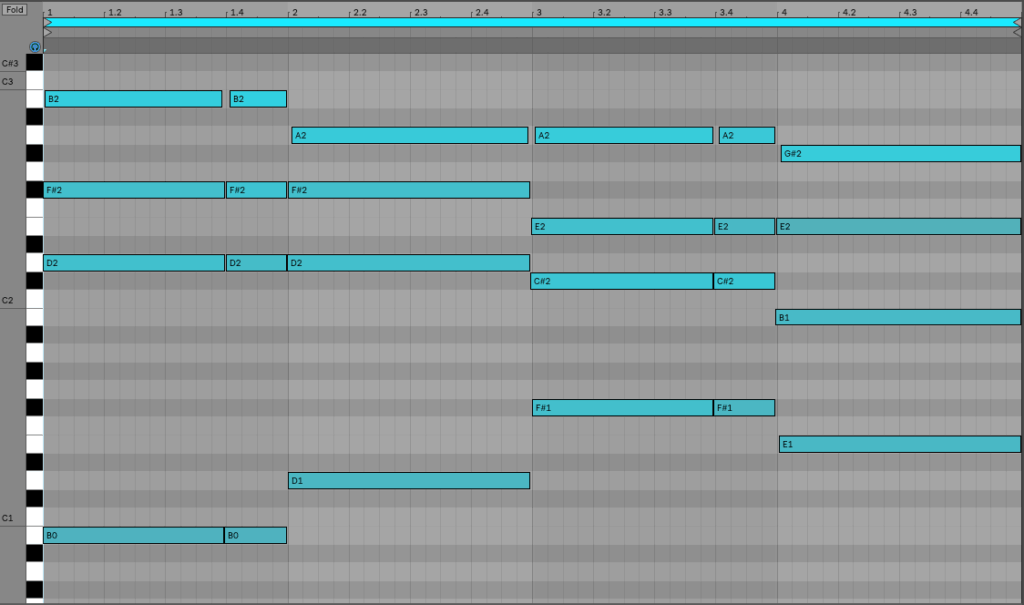
Below is the intro progression:
Listen:
What are we working with?
The progression is: Bm – D – F#m7 – E
- Bm: B – D – F#
- D: D – F# – A
- F#m7: F# – A – C# – E
- E: E – G# – B
Now, let’s look at how ODESZA is able to take this chord progression and weave it through the rest of the track.
Topics Covered:
- Avoiding Home
- Disguising Chords
- Rephrasing the Progression
- How to Write a Proper Vocal Chop Hook
- Melodic Repetition
- How to Write Basslines in Context
1. Avoiding Home
First off, let’s break down this chord progression.
The progression is: Bm – D – F#m7 – E

Listen:
Numerically, it is: ii – IV – vi – V
What’s missing in this progression?
There is no one chord.
Throughout the entire song, ODESZA never lands on the one chord.
This is a bit strange. Normally, the one chord is our home, providing a sense of resolution and release.
If you read my previous track breakdown about Flume’s track “Say It”, I wouldn’t shut up about how important the one chord is to the emotional tone of a song.
So how does ODESZA make this chord progression work without ever landing on the one?
First off, this progression sounds good on its own. If I didn’t tell you there wasn’t a one chord, you may not have noticed it was missing.
However, there is this sense of tension created by the fact that the one chord isn’t present.
Its as if the progression is always searching for the one chord, for it’s home, but it never finds it.
Now does this fit the emotional quality of the song? Absolutely.
This progression never has that final sense of resolution. It gives you hope for it, but never provides it.
This is what is happening theoretically, and I’d say that’s what is happening emotionally too.
Is it a common music theory technique to leave out the one chord?
I wouldn’t say it’s incredibly common, but it happens.
Another song that comes to mind with a similar progression is Days to Come by Sevens Lions, which actually has the exact same progression movement, only in F Major. I’m sure there are plenty of others.
How can you use this technique?
The most obvious example is to experiment with chord progressions that don’t land on the one chord. Perhaps you could write a verse progression that doesn’t use the one chord, then bring the one in during the chorus for a big resolution.
It’s important to note that although omitting the one chord creates a sense of tension, the progression itself is quite happy and uplifting. This dichotomy helps balance out the tone and character of the progression.
2. Disguising Chords
Don’t be mad.
But…
The one chord is kind of in this progression, but it isn’t immediately obvious.
What do I mean?
Let’s look back at the intro progression:

Listen:
Take a closer look at the third chord. It’s F#m7. Spelled out, it’s F# – A – C# – E.
Do you see the one chord? The one chord in the key of A is A Major, i.e. A – C# – E.
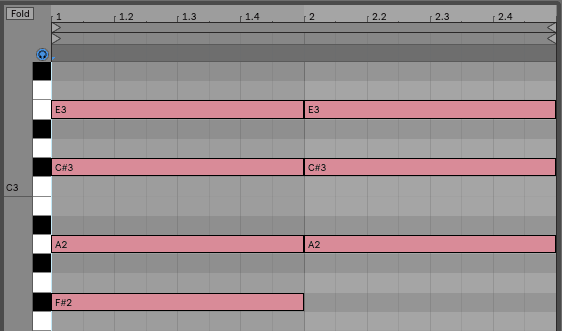
(The first chord is F#m7, and the second is A)
Essentially, you are getting the A major chord, only housed within the F#m7.
This resolution isn’t as strong as it would be if it was just an A chord, but there is still some sense of resolution with the F#m7.
What can you take away from this?
If anything, think carefully about the relationship between triads and extended chords. As you start to learn more about music theory, pay attention to the relationship between the notes in an extended chord, and use that information to craft more compelling and exciting chord progressions.
For example, if you’re playing an extended chord, such as a seventh or ninth, think carefully about the chord voices you are using. If you’re playing the root note in the bass, you don’t necessarily need the root note in the chord: you’ll still get the quality of the chord across, all while creating a more open and spacious voicing.
Take the F#m7 from earlier. If you’re playing F# in the bass, you could omit the F# in the chord. Listen to the example below, noticing how the tone of the chord stays the same:

Listen:
3. Rephrasing the Progression
Say My Name starts off with a guitar playing the progression I showed you earlier. This progression loops until the verse, where ODESZA changes the progression.
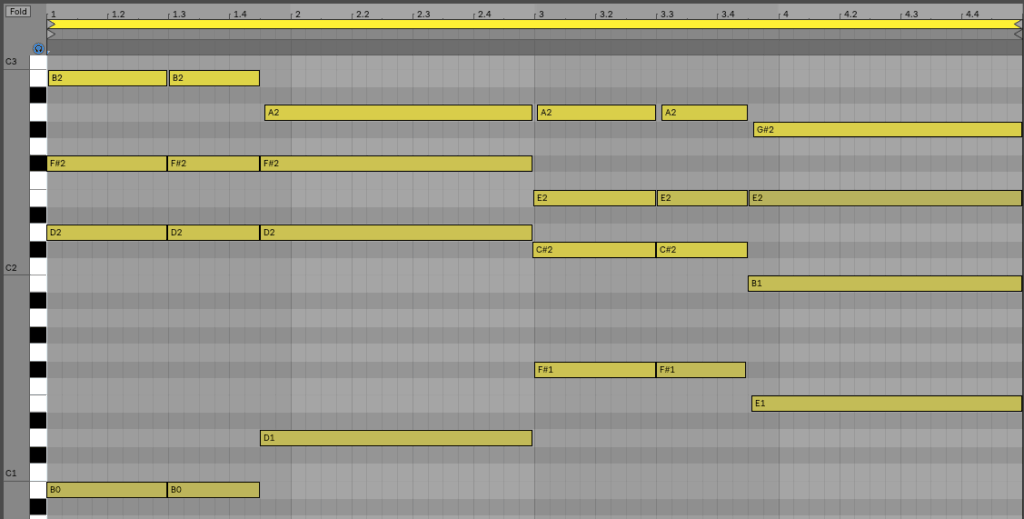
Below is the verse chord progression:
Listen:
This progression is nearly identical to the one used in the intro.
The same four chords used in the introduction are also used in the verse (Bm – D – F#m7 – E).
There are two important distinction between the intro and the verse progressions: the way they are played and the instruments used.
The first difference is their timing and rhythm.

Above, you can compare the difference. The blue MIDI represents the intro progression rhythm, and the yellow MIDI represents the verse progression rhythm.
The second and fourth chords in the verse come in an 1/8th note earlier than in the introduction. This isn’t much, but it’s enough of a change to add a subtle but important distinction between the two.
The second difference is in the instrumentation.
During the intro, the progression is played by a guitar. During the verse, it’s played by a piano. This helps to further the distinction between these sections.
This is an essential component of strong songwriting: the ability to create contrasting sections that purposely relate.

These two progression serve as the melodic foundation for the song. One of these two progressions is present throughout the entire track.
4. How to Write a Proper Vocal Chop Hook
Let’s look at the vocal chop hook in the intro of Say My Name.
Below is a transcription of the vocal chop melody:

Listen:
To contextualize this melody, here it is played with the chords:
First, I want to talk about sonic composition of the melody.
Vocals chops are nothing new to electronic music. It’s common for songs to feature a vocal chop or manipulated vocal in some form.
The reason vocal chops work so well is that they carry the timbre and texture of the human voice. This helps the listener easily pick up on the sound, since as humans we’re naturally inclined to focus in on human speech.
But lots (and lots) of songs have vocal chops. What makes ODESZA’s vocal chop in Say My Name stand out?
They’re using the vocal as an instrument, not just as an effect.
The vocal chop in Say My Name is a melodic instrument. It’s not just a bunch of glitched out vocal cuts in no particular order. The sum of each individual vocal chop adds up to a distinct, recognizable melody line.
Listen back to the original melody. Does the melody sound good played on a piano? Absolutely.
The fact that this melody is “played” by a dynamic vocal makes it all the more interesting and exciting.
What can you take away from this?
If you’re creating a vocal chop, focus on the implied melody. The vocal chop should have a distinct and identifiable melody for listeners to pick up on.
5. Melodic Repetition
Let’s look back at the melody of the vocal chop in Say My Name.
I don’t want to dive too deep into melody writing in this article (if you want more articles on melody writing, leave a comment or shoot me an email).
However, I do want to look at one key element of this melody: repetition.
One of the key components to a strong melody is meaningful repetition. Proper repetition will help make the melodic development of a song feel natural and organic.
The idea is simple: take a melodic idea and make small but meaningful tweaks to it’s rhythm, melody, and contour. The goal is to create two distinct but interrelated melodic ideas.
Let’s look at how ODESZA uses repetition in Say My Name.
Below is the intro melody we looked at in the last section.

Listen:
We can think of this melody as being comprised of two sections: an A and a B. The A section is the first two bars, and the B section is the last two bars.
How do the A and B sections of this melody relate?
There a few differences between the A and B sections. I’ve highlighted the changes below.

Listen:
As you can see, these changes aren’t much, but they are enough to create a distinction between the two. This makes it so when the listener hears the B section it sound new, but familiar.
Main takeaway: Use repetition to craft more compelling and memorable melodies.
6. How to Write Basslines in Context
Let’s look at what ODESZA does with the bass during the verse.
We’ve already discussed the chord progression used in the verse. It’s a fairly static four chord progression.

Listen:
Below is a transcription of the verse bass line:
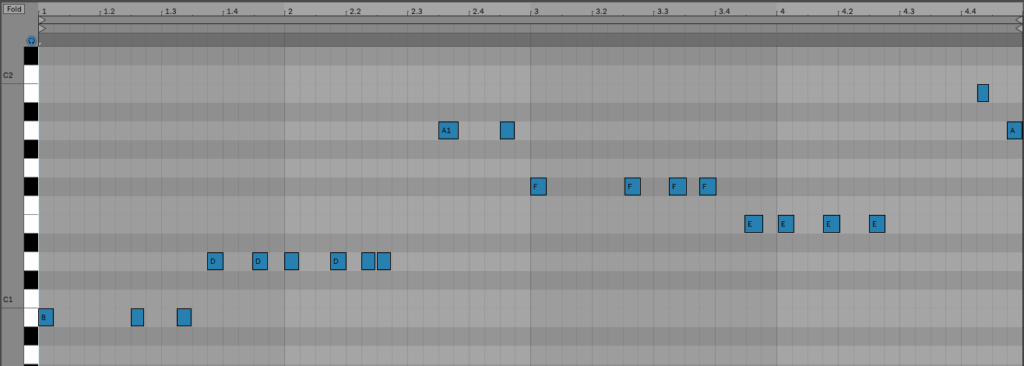
Listen:
Now, let’s take a listen to the bass and chords played together:
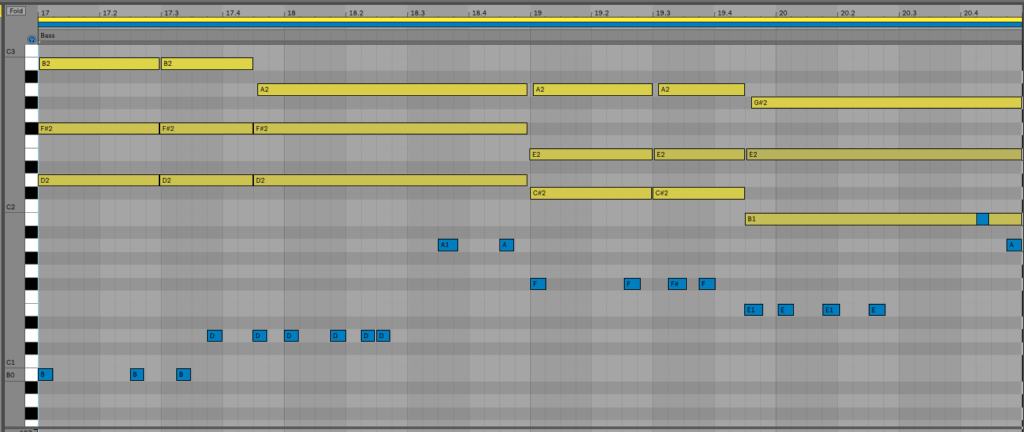
Listen:
The main thing I want you to focus on is the rhythmic distinction. The chords are static, which contrasts with the active baseline.
The adds a purposely and harmonious balance between the two. The chords lay a strong foundation for the verse, while the bass is the driver that pushes the track forward.
This is something you’ll want to pay special attention to in your songwriting. Focus on the rhythmic and melodic relationship between the elements in a song.
As always, this depends on context. The verse in this track is fairly poppy and upbeat, so it makes sense to have a baseline that pushes the track forward.
This contrasts with the chorus, where the bass is kept relatively static. There are several elements added during the chorus that help drive the energy of the track. Because of this, there isn’t a need for an overly active bassline.
Below is a transcription of the chorus bassline:

Listen:
Main takeaway: Carefully craft how the rhythm and melody of your chords and bass interact.
Want free access to the Track Breakdown MIDI Vault? You can download the MIDI from all of our Track Breakdowns, as well as 25 hi-quality MIDI chord progressions you can use in your own productions.
Conclusion
I hope you were able to take away some useful tips from this article. Learning proper songwriting is a difficult process, so I want to help make the journey as easy as possible for you.
I tried to pull out as much valuable information as I could from this song, helping you to better understand what makes a great song, well, great.
There’s a good amount of information to digest here, so I’d recommend re-reading it a few times to soak up all the different elements.
The point isn’t to memorize everything in this article, but to let this article guide your workflow, adding additional tools to your music-writing arsenal.
Lastly, if there are any songs you’d like covered, please let me know!
Want to read more breakdowns? Click here to visit the Track Breakdown Glossary.
[x_author title=”About the Author”]

